Smart EnOcean Gateway
DC-GW/EO-IP
Manual
Contents
2.3 Menu point "Internet of Things"
English edition 05/2016 Documentation © 2016 Digital-Concepts GmbH, Germany
All rights reserved. This manual may not be reproduced in part in any form or duplicated using electronic, mechanical or chemical processes or processed without the written permission of the publisher.
It is possible that this manual has printing technology defects or typographical errors. However, the specifications of this manual are regularly reviewed and corrections are made in the next issue. For technical or printing errors and their consequences Digital Concepts GmbH assumes no liability.
Before using the Gateway, please read these instructions carefully. If you pass the product on to third parties, give them this manual, too.
More information, associated software, as well as the latest version of the manual can be found on our website www.enocean-gateway.eu
This handbook should be seen as an extension of the Quick Start guide "Quick Start" which Digital Concepts already attaches to your product. It describes in detail, both the properties of the gateway, the menu structure, as well as the processes that are necessary for start-up and subsequent operation.
For installation instructions and basic information about the physical start-up, please look at our " Quick Start " !
|
Technical notes [FAQs] and downloads are available on our homepage: www.enocean-gateway.eu
If you have technical problems or comments, please directly contact support from Digital Concepts GmbH.
Phone: +49 711 508 704 – 70 E-mail: support@digital-concepts.eu
|

Hazard statements:
|
•Do not use for purposes other than the intended use. •Use only indoors and avoid external influences such as moisture, dirt/dust and sunlight or other heat load. •Avoid repositories enclosed by metal, as these affect the transmission power. If a mount in DIN rail is to be made, precautions should be taken to mount the antenna outside the control cabinet. •Do not open the device. In case of failure, please contact the DC support team. |

The web interface is primarily used to:
•commission and configure the gateway
•Register and configure the EnOcean components
•Monitor the transmitted states (telegrams)
•Analyze errors in the system
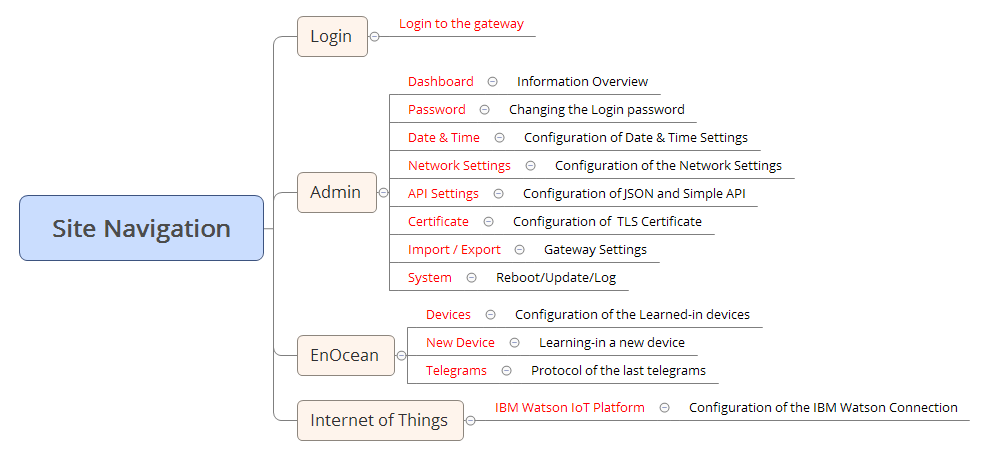
The menu structure
For easy navigation, the complete menu structure of the gateway is shown here. The manual is based on this order and explains the individual areas .
Menu item "Login" - registration at the gateway.
Discovering the gateway is described here
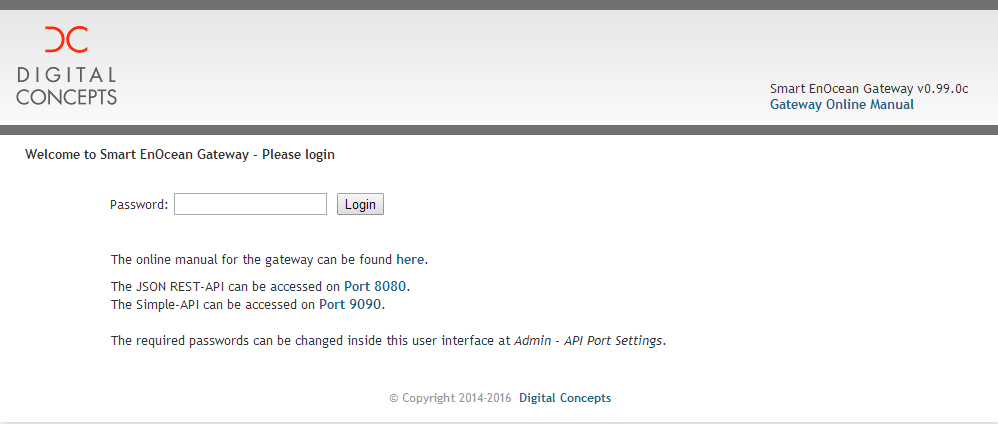
If a physical connection is established, you should see the logion page of the gateway.
You have to enter a password. The default password is “admin”. Please change it afterwards.
All administrative settings and values which are fundamentally important for the gateway can be configured here.
System Info - General Info System
After a successful login the system information page is shown.
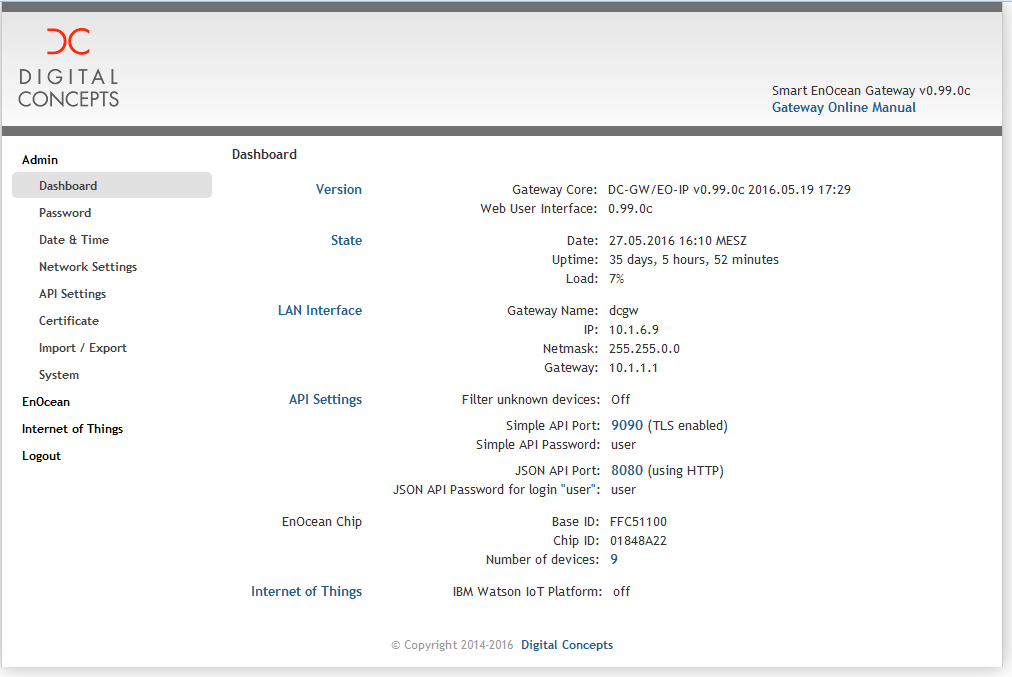
As the name implies, you can view basic information here regarding the current state of your gateway.
Version: actual software release of the gateway
•Do you have the latest firmware? – see section: Firmware
State & Date: actual time & clock settings
•Possibilities for adjusting can be found under the menu item "Date & Time”
Uptime: Uptime since last reboot
Load: Load of the Gateway. As the hardware consists of a multiprocessor, there can be a load of above 100%.
LAN Interface: The actual network configuration of the gateway
•Possibilities for adjusting can be found under the menu item "Ethernet”
Port Settings: Current port setting for the two API versions with password
•Possibilities for adjusting can be found under the menu item „API Port Settings“
•Notes on the API can be found in the "API Port Settings" menu or in the corresponding API descriptions in the download section of the Gateway website.
EnOcean Chip: Information on the current status of the EnOcean chipset.
Base ID: Base ID of the gateway
Chip ID: Serial number of the EnOcean chipset
Filter Mode: When enabling the filter mode, only telegrams of learned-in devices are transmitted though the gateway on the API and on the Telegram menu. Default is off. This is used to limit the output of the gateway only to the desired devices.
oPossibilities for adjusting can be found under the menu item „EnOcean Chip“
Number of devices: Number of currently learned-in devices.
Password – Changing the password
In order to protect the gateway from unauthorized access it is strongly recommended to change the factory-set password [factory setting: admin]. Make sure that your password is not too complex. It is not possible at this stage of development of the gateway to reset the password.
Date & Time – Configuration of date & time
In this menu the appropriate time settings of the gateway can be made. The gateway provides the ability to sync via the Internet service NTP. To do this, enter your favorite NTP server. Alternatively, the time can also be entered manually. However, this can lead to variations in the time after a certain period of operation.
Ethernet – Network setting of the gateway
In this menu you can adjust the Gateway IP settings according to your environment. By default the gateway is in DHCP mode (Dynamic Host Configuration Protocol), in which the gateway gets its IP-settings automatically transmitted from the server/router. If you prefer manual adjustment you can change the mode from DHCP to Static and enter your desired values.
ServiceIP: Besides the above-mentioned possibilities, the gateway also provides a ServiceIP. This IP address cannot be changed and is for the purpose of support. This IP address is: 192.168.66.69.
EnOcean Chip
Each gateway includes an EnOcean communication chip with an individual chip ID. This chip ID is similar to a serial number and unchangeable.
API Settings – Port configuration of Simple API & JSON API

This menu allows the ports and passwords for both APIs to be set individually. There are several ways you can check the output of the gateway of each API:
Simple String API
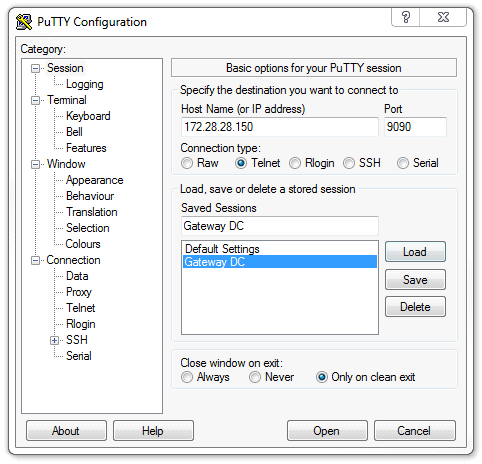
Using the freewaretool “PuTTY” and the configuration of the Gateway API, it is easy to connect to the Simple API and look at the output.
Start the software, define the IP as required and choose „telnet“ as connection type. After setting the port to the corresponding Simple API port (default 9090), you can start the connection.
In the window shown you can see the connection startig with the actual version of the gateway. Press return and login with the desired user. (Default password: user)
login; password=user
Now you can see all the incoming and outgoing telegrams – one command per line.
Restful JSON API
The default port for the JSON API is <IP of gateway: 8080>. Here the gateway shows all the features that it offers with an easy to understand interface. The full range of functions is displayed and the syntax of the calls may be tested at any time extensively.
To use the JSON API, point your browser to the address <IP of gateway: 8080> and log in with as a user with the appropriate password. You now have reached the Help page of the JSON API. The coding of the JSON API is "UTF-8".
A detailed description of the Simple String & Restful JSON API can be found at the download section of: www.enocean-gateway.de
Menu Item "Import/Export" – Backup and restore of configurations
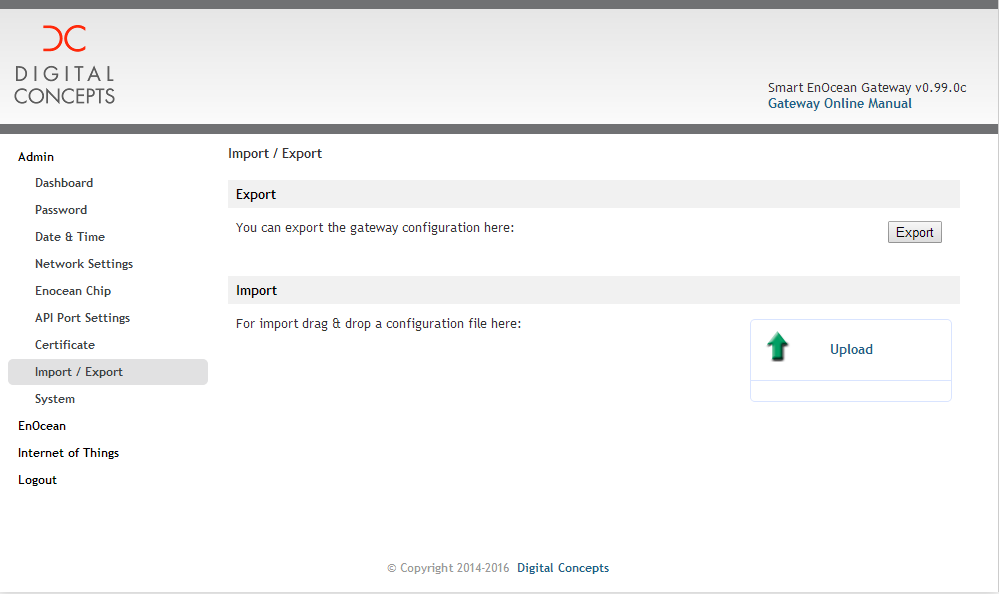
•Export of the Gateway configuration
The complete configuration and settings of the gateway can be saved in a configuration file "dcgw.conf". Press the "Export" button and select the destination folder according to your browser.
The following information is saved:
-Network settings
-EnOcean Settings (API settings)
-Device Database (Sensors and actuators)
•Import of the Gateway configuration
To load a configuration file into the gateway, please drag the configuration file (e.g. dcgw.conf) to the field "Upload" (drag'n'drop). Three possible sections show up for you to choose what part to import.
Menu Item System – How to update the firmware
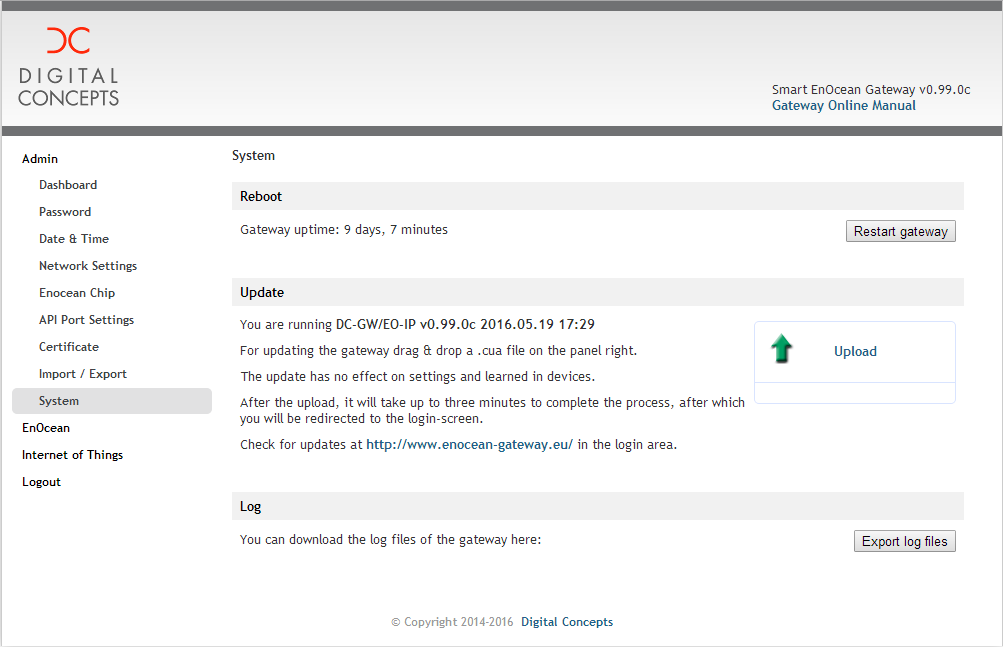
The Digital Concepts EnOcean Gateway will be improved over time with new profiles and new functionalities.
These improvements (new firmware) will be available on the homepage www.enocean-gateway.de in the support section and will have to be uploaded in the firmware menu of the gateway.
As described in the menu “Import/Export” please drag and drop the new firmware to the field “Upload”
The gateway will check the file before starting an update process. Nothing will happen if the file is not suitable.
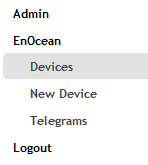
This menu contains management options for connected EnOcean devices. The options include learning-in (pairing) of new devices, editing features and communication settings for existing devices, and deleting sensors and actuators from device database.
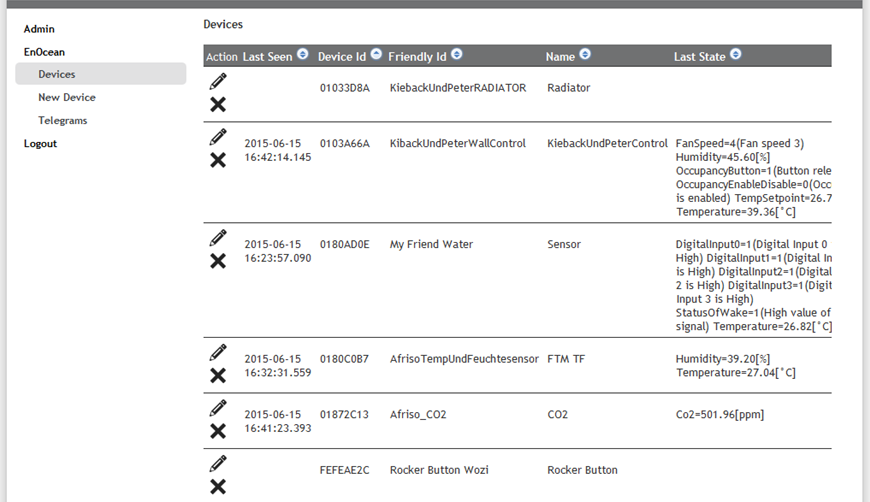
Menu Item "Devices" – Overview of registered EnOcean devices
Upon selecting the Devices menu, a table of all registered devices is displayed. The following managing options are available:
![]()
![]()
| EDIT – Editing properties of a learned-in device – edit device name and description, switch between API versions and select which telegrams are to be accepted and translated by the gateway. Changes of Device ID and profile version are not possible, as these values are set during the Learn-in procedure. In order to change Profile or Device type, the device needs to be deleted and learned-in again. |
![]()
DELETE – Remove device from database – Deletes a device from the gateway’s database. Use if device is no longer used or if fresh learn-procedure is needed.
![]()
Indicates time of the last valid telegram reception from this device.
![]()
Unique identification number assigned to device – 8 character hexadecimal address (range: 00000000 – FFFFFFFF) assigned by manufacturer to each produced device. Hardware based and not changeable.
Friendly Id and Name
User definable fields, assignable to each device. Friendly Id and name have to be unique. Assign meaningful and easily recognised names to devices in order to simplify managing and grouping of devices.
![]()
Name of EnOcean product
![]()
Description of device and usage details
Example: Friendly ID - Eltako XYZ
Name - Light switch bedroom
![]()
Last received and recognized device state. e.g. Contact open / Contact closed, measure of temperature and humidity.
![]()
Use the arrow button to sort data in ascending or descending order for selected values
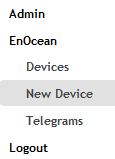
Menu Item "New Device" – Registering new EnOcean devices
Learning-in of new devices can vary in complexity depending on manufacturer and device type. For example, to learn-in a rocker button, a normal button press is enough to complete the learn-in procedure. For other devices, learn-in mode can be triggered by a magnet, pressing the special button or some other way of learning-in, as described by device’s manual.
Two basic learn-in methods are available:
1.detect device automatically
2.add device manually
For the user, this offers both learning-in of well known existing devices and unknown or experimental/prototype devices. As long as communication parameters and protocol details are known, almost all devices can be learned-in and added into the gateway database.
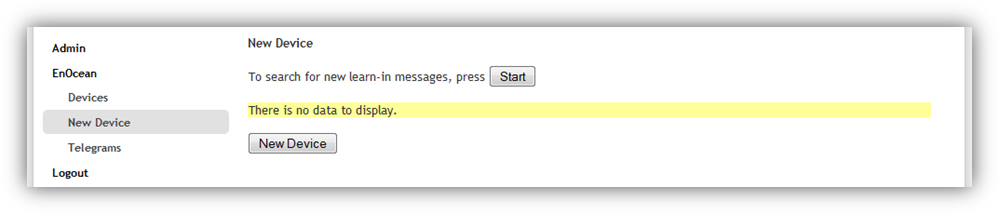
Learn-in via automatic device detection
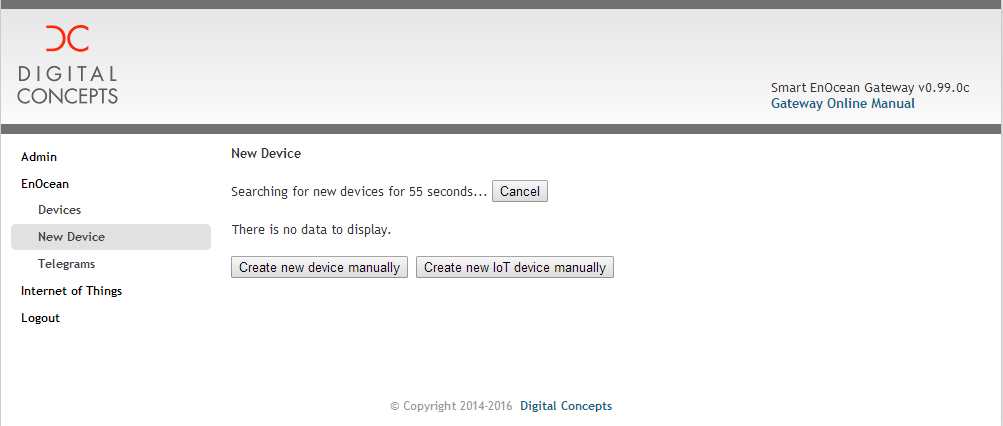
Press the “Start” button to set gateway into “search mode” in order for the gateway to automatically recognize new device. The gateway will search for new devices for 60 seconds.
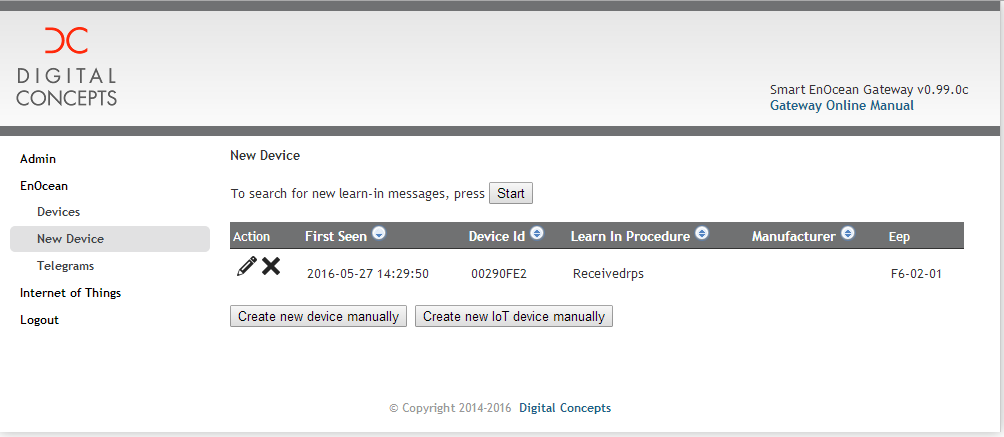
In the following example, a rocker switch module PTM 215 (4 push buttons, 2 rockers) is being learned-in:
EnOcean -> New Device –> press “Start” – Newly discovered devices will be shown upon detecting.
Gateway now recognizes and identifies new device by its unique Device Id and EnOcean Profile range (F6-??-??). Explanation and further information about EnOcean profiles can be found at https://www.enocean-alliance.org/de/enocean_standard/.
It is important to note that new a device is recognized and displayed, however it is still not added into the gateway’s database.
![]()
Press “EDIT“ – Continue the learn-in procedure by selecting the “EDIT” button.
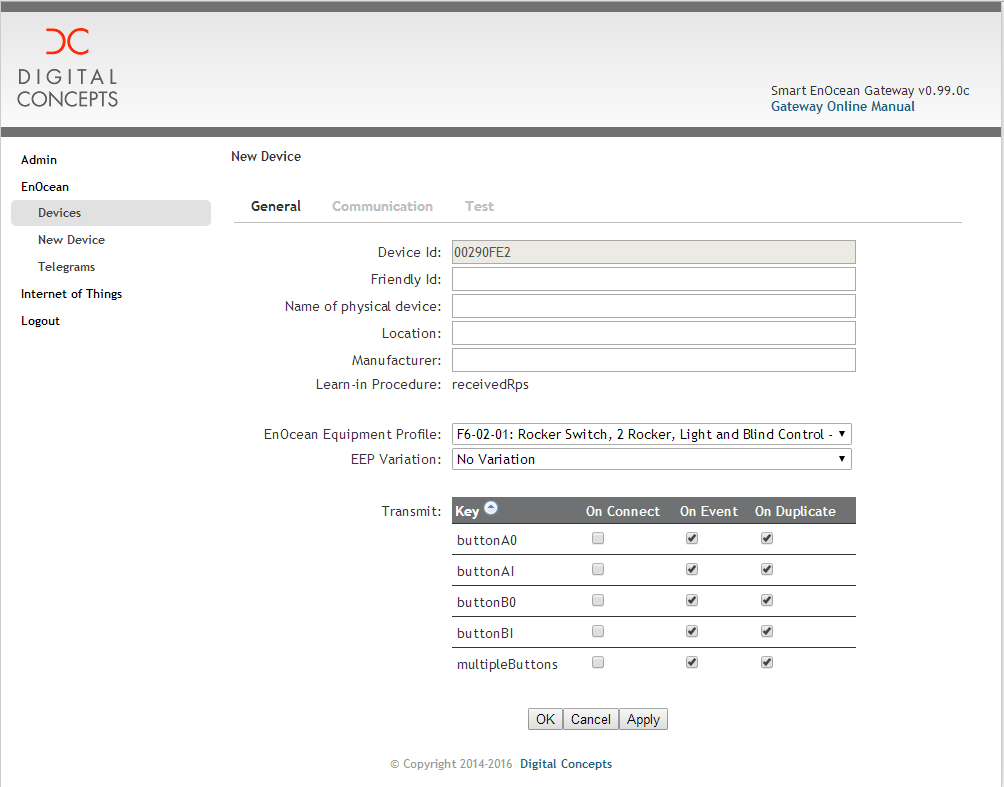
Under the tab “General”, device specific parameters and fields must be filled-in before a device can be saved to the gateway’s SQL database.
Tabs “Communication” and “Test” will be explained later in the manual, as they are not critical for the completion of a learn-in procedure.
Depending on the device, more or less additional information must be entered before proceeding. The following parameters must be entered:
-Device Id: Unique device identifier received during the learn-in procedure. Can often be found printed on the device itself.
-Friendly Id: Contains description of device‘s function.
In our example “Rocker switch”
-Name of physical device: Device name
In our example, “Light switch Living room”
-Location: Enter the location of the device
-Manfacturer: Enter the manufacturer’s name, if known
-Learn-in Procedure: Shows the learn-in method (device specific, automatically recognized)
oreceivedRps – Device has been detected and recognized automatically
omanuallyConfigured – Device is added manually
-EnOcean Equipment Profile – The correct device profile must be selected.
In our example: F6-02-01: Rocker Switch, 2 Rocker, Light and Blind Control
-EEP Variation: Used in special cases when the manufacturer does not comply with the standard EEP rules.
-API Version: Currently only version 1.0 is available. As new API features are introduced and implemented, older versions will stay available in order to retain compatability.
-Transmission modes:
Every EnOcean device sends and receives data as described by the device’s EnOcean Equipment Profile. Reported values and states can be filtered by selecting or deselecting checkboxes. When a value checkbox is selected, the gateway will report the value to connected TCP/IP clients. When not selected, the gateway will not translate this particular type of message. It is worth noting that devices can use multiple EEP profiles, therefore they have to be learned in twice or more times. The following transmission mode options are available:
•On Connect
Last known value will be reported to a TCP/IP client upon establishing connection. Immediately after a client connects, all known EnOcean values will be transmitted. Together with the last known state, age of data (in milliseconds) and UTC timestamp will be reported. After the initial data stream has been transmitted, the gateway will start reporting incoming data as it is received.
Note: If none of the devices in the database have this attribute enabled, translation of events will start immediately after the TCP/IP connection has been established.
Default Setting: On
•On Event
Incoming EnOcean values are translated and sent to a connected TCP/IP client as soon as they are received. This checkbox is helpful when filtering which incoming values should be processed. Devices often lack sensors for predefined EEP values, e.g. only humidity sensor in device that uses humidity & temperature profile. In this case, the transmission of the temperature value can be disabled.
Default Setting: On
•On Duplicate
The gateway will transmit received values to a TCP/IP client, even if device values are unchanged in comparison to the last reported value. This happens when devices report values in a cyclic pattern. Heating controllers will often report values once every 10 min, and then drop back to deep standby mode. Disabling this option will eliminate unnecessary API traffic.
In many cases the result of the EnOcean Energy Harvesting scheme is the cyclic transmission of data. In the majority of cases, it is enough to transmit a value only after the value has been changed. Alternatively, the gateway can be asked at any time to report the last know value. An exception might happen when dealing with safety related functions, as lack of transmitted information might falsely indicate a malfunction or defect. If this is the case, the TransmitOnDuplicate setting can be enabled manually.
Default Setting: Off
After all settings have been set, there are two saving options to chose from:
1.Apply – Settings are saved and EnOcean device is added to gateway’s database. Configuration page stays open.
2.OK – Settings are saved and EnOcean device is added to gateway’s database. Configuration page is closed and web browser is redirected back to “Devices” menu.
New device is now registered on gateway and visible in the list of devices. Subsequent changers are possible via the “Edit” button.
Adding a device manually
As already mentioned, the complexity of the learn-in procedure depends greatly on the device that is being added. Some devices are not compatible with the automatic learn-in process. Therefore, they need to be added manually. During the learn-in of a simple button (see “Learn-in via automatic device detection”), the only direction of communication i.e. telegram transmission, is from device to gateway. Some devices cannot complete the learn-in procedure without receiving a confirmation telegram from the gateway, a so called “welcome message”. Thus, before learning-in, the gateway must be correctly configured in order to transmit the correct “welcome” telegram. That requires some detailed information about your device to be entered during the learn-in procedure.
•To start the manual learn-in procedure, navigate to EnOcean section, New Device menu. Under the button which starts automatic device learn-in, there is a “New device” button, which leads to the manual learn-in menu [EnOcean->New Device-> New Device].
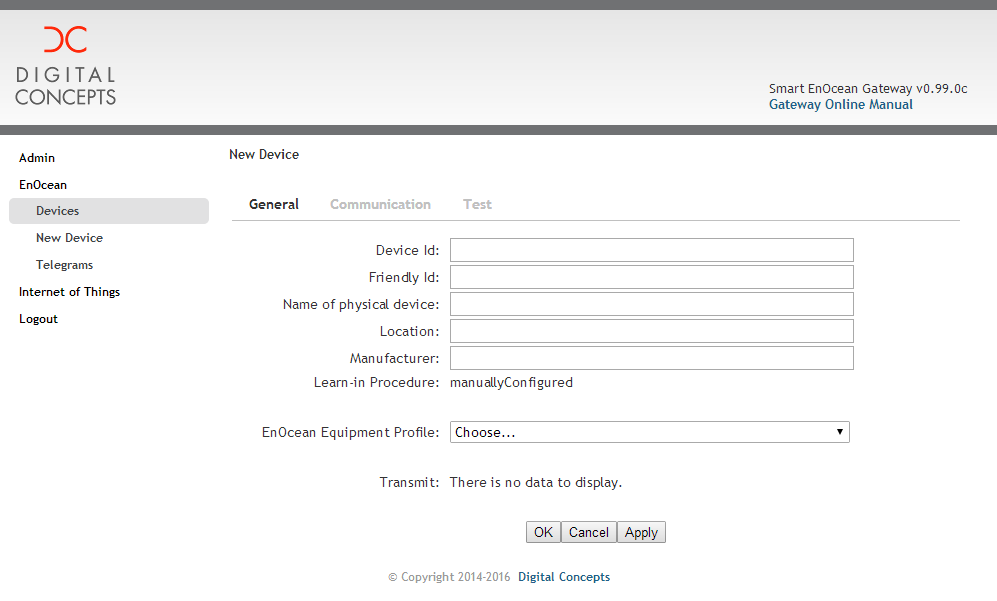
The device’s details and parameters must be entered here. In contrast to the automatic learn-in procedure, all device data, including the Device ID, must be manually specified.
After entering the correct device profile and all required data, press “Apply” in order to save the device into the gateway‘s database.
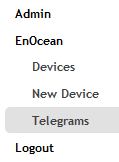
Menu Item "Telegrams" – Overview of telegram traffic
This page contains an overview of all transmitted and received messages between the gateway and the devices currently learned-in (devices in database). User can switch data view between the original code (raw) and analyzed/processed representation of same code (parsed).

Menu Item "Internet of Things"
Under this menu point, all available Internet of Things connectors are shown and can be enabled/disabled.
Menu Item "IBM Watson IoT Platform"
This page shows the connector to the Watson IoT Platform of IBM.
You can get yourself an account at the IBM Cloud entry point under http://www.ibm.com/internet-of-things/iot-solutions/watson-iot-platform/
If you enter your credentials here, the gateway will connect to the IBM Cloud and send/receive all data from and to your account.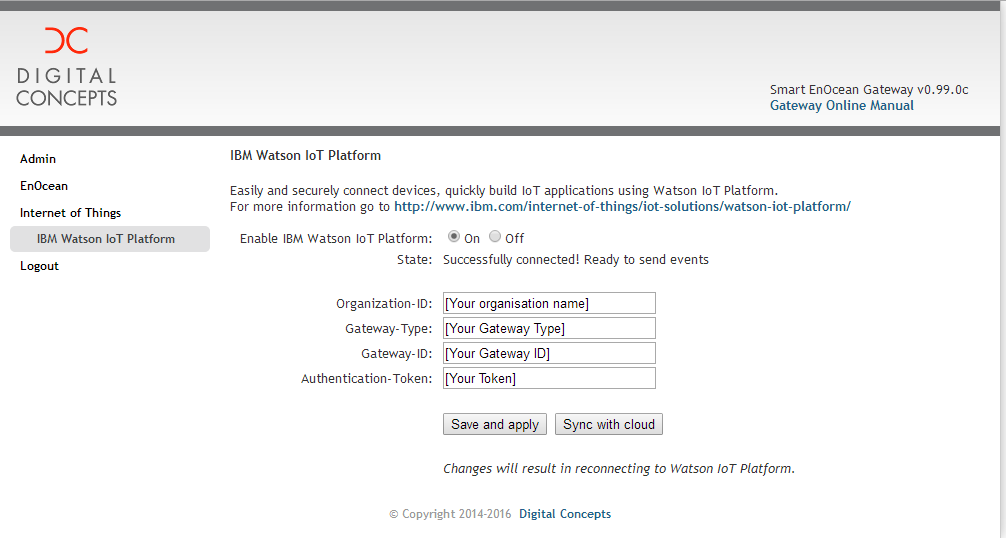
Logout
Ends current management session.
Legend
|
ATTENTION! Important information, crucial to device’s functionality. |
|
NOTE. Paragraph contains additional or extended information. |

